前言 既然标题说了是深入Babel,那我们就不说Babel各种用法了,什么babel-core,babel-runtime,babel-loader……如果你想了解这一部分内容,这类文章很多,推荐最近看到的一篇:一口(很长的)气了解 babel ,可以说是相当详实完备了。
言归正传,这篇文章主要是去了解一下Babel是怎么工作的,Babel插件是怎么工作的,以及怎么去写Babel插件,相信你看完之后一定会有一些收获。
那我们开始吧!
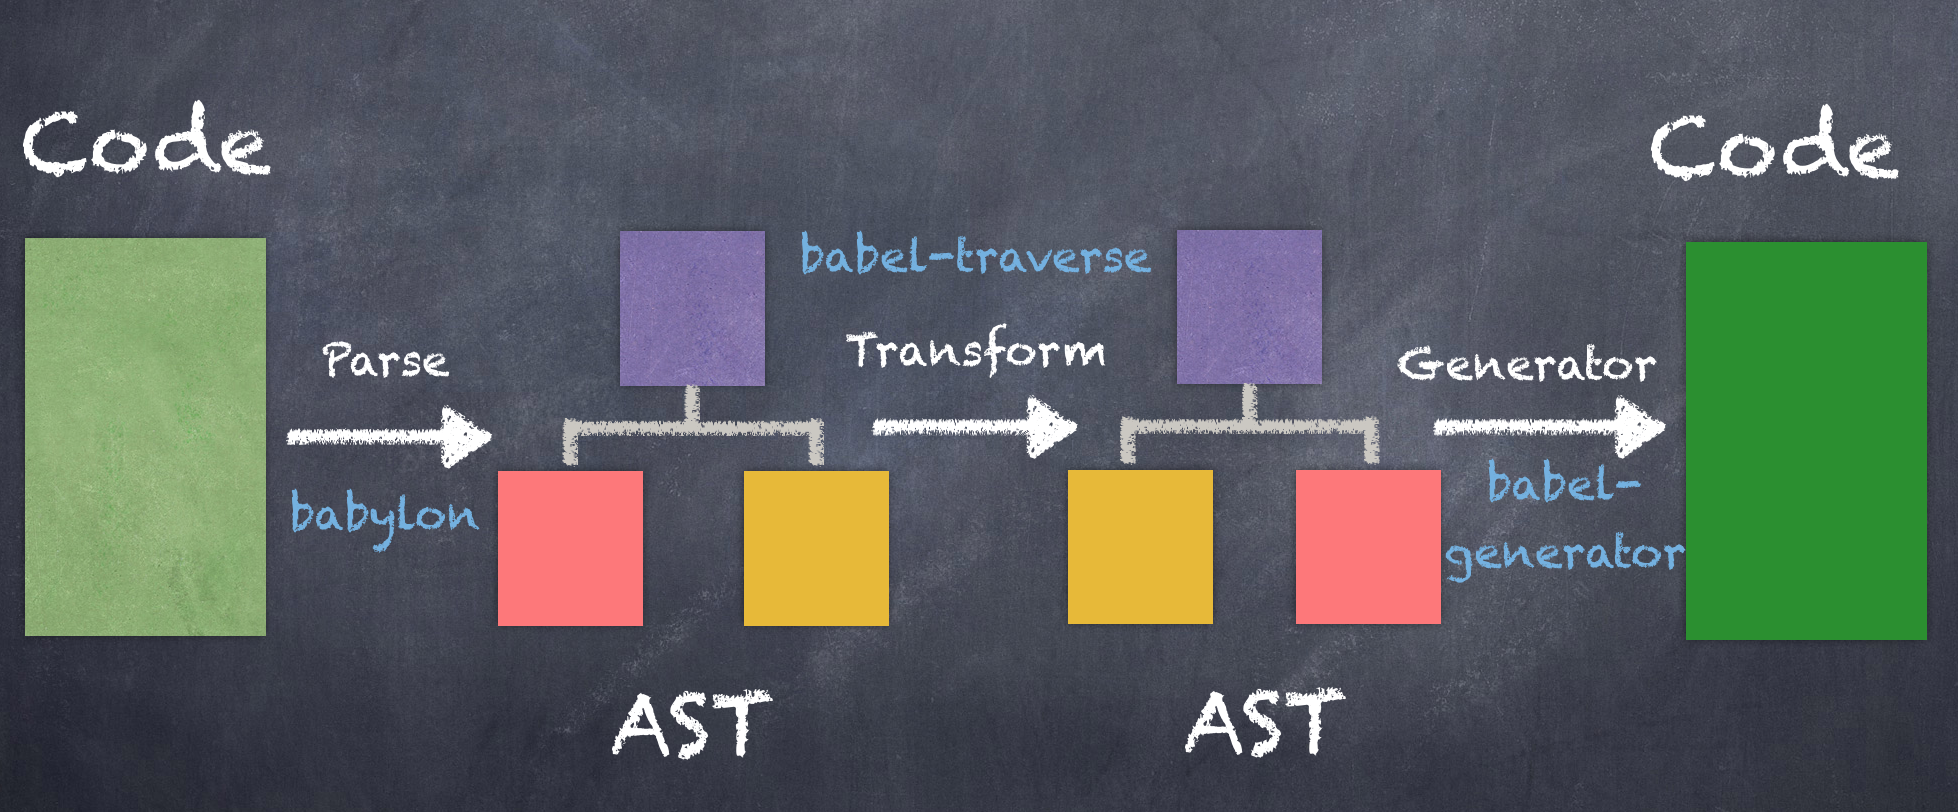
抽象语法树(AST) 要了解Babel的工作原理,那首先需要了解抽象语法树,因为Babel插件就是作用于抽象语法树。首先我们编写的代码在编译阶段解析成抽象语法树(AST),然后经过一系列的遍历和转换,然后再将转换后的抽象语法树生成为常规的js代码。下面这幅图(来源 )可以表示Babel的工作流程:
1
2
3
4
5
function add (x, y) { return x + y; } add(1 , 2 );
然后将代码解析成抽象语法树(在线工具 ),表示成JSON形式如下:
1
2
3
4
5
6
7
8
9
10
11
12
13
14
15
16
17
18
19
20
21
22
23
24
25
26
27
28
29
30
31
32
33
34
35
36
37
38
39
40
41
42
43
44
45
46
47
48
49
50
51
52
53
54
55
56
57
58
59
60
61
62
63
64
65
66
67
68
69
70
71
72
73
74
75
76
77
78
79
80
81
82
83
84
85
86
87
88
89
90
91
92
93
94
95
96
97
{ "type" : "Program" , "start" : 0 , "end" : 52 , "body" : [ { "type" : "FunctionDeclaration" , "start" : 0 , "end" : 40 , "id" : { "type" : "Identifier" , "start" : 9 , "end" : 12 , "name" : "add" }, "expression" : false , "generator" : false , "params" : [ { "type" : "Identifier" , "start" : 13 , "end" : 14 , "name" : "x" }, { "type" : "Identifier" , "start" : 16 , "end" : 17 , "name" : "y" } ], "body" : { "type" : "BlockStatement" , "start" : 19 , "end" : 40 , "body" : [ { "type" : "ReturnStatement" , "start" : 25 , "end" : 38 , "argument" : { "type" : "BinaryExpression" , "start" : 32 , "end" : 37 , "left" : { "type" : "Identifier" , "start" : 32 , "end" : 33 , "name" : "x" }, "operator" : "+" , "right" : { "type" : "Identifier" , "start" : 36 , "end" : 37 , "name" : "y" } } } ] } }, { "type" : "ExpressionStatement" , "start" : 42 , "end" : 52 , "expression" : { "type" : "CallExpression" , "start" : 42 , "end" : 51 , "callee" : { "type" : "Identifier" , "start" : 42 , "end" : 45 , "name" : "add" }, "arguments" : [ { "type" : "Literal" , "start" : 46 , "end" : 47 , "value" : 1 , "raw" : "1" }, { "type" : "Literal" , "start" : 49 , "end" : 50 , "value" : 2 , "raw" : "2" } ] } } ], "sourceType" : "module" }
这里你会发现抽象语法树中不同层级有着相似的结构,比如:
1
2
3
4
5
6
{ "type" : "Program" , "start" : 0 , "end" : 52 , "body" : [...] }
1
2
3
4
5
6
7
{ "type" : "FunctionDeclaration" , "start" : 0 , "end" : 40 , "id" : {...} , "body" : {...} }
1
2
3
4
5
6
{ "type" : "BlockStatement" , "start" : 19 , "end" : 40 , "body" : [...] }
像这样的结构叫做节点(Node) 。一个AST是由多个或单个这样的节点组成,节点内部可以有多个这样的子节点,构成一颗语法树,这样就可以描述用于静态分析的程序语法。
节点中的type字段表示节点的类型,比如上述AST中的”Program”、”FunctionDeclaration”、”ExpressionStatement”等等,当然每种节点类型会有一些附加的属性用于进一步描述该节点类型。
Babel的工作流程 上面那幅图已经描述了Babel的工作流程,下面我们再详细描述一下。Babel 的三个主要处理步骤分别是: 解析(parse),转换(transform),生成(generate)。
解析
将代码解析成抽象语法树(AST),每个js引擎(比如Chrome浏览器中的V8引擎)都有自己的AST解析器,而Babel是通过Babylon 实现的。在解析过程中有两个阶段:词法分析 和语法分析 ,词法分析阶段把字符串形式的代码转换为令牌 (tokens)流,令牌类似于AST中节点;而语法分析阶段则会把一个令牌流转换成 AST的形式,同时这个阶段会把令牌中的信息转换成AST的表述结构。
转换
在这个阶段,Babel接受得到AST并通过babel-traverse对其进行深度优先遍历,在此过程中对节点进行添加、更新及移除操作。这部分也是Babel插件介入工作的部分。
生成
将经过转换的AST通过babel-generator再转换成js代码,过程就是深度优先遍历整个AST,然后构建可以表示转换后代码的字符串。
这部分更详细的可以查看Babel手册 。
为了了解Babel在遍历时处理AST的具体过程,我们还需要了解下面几个重要知识点。
Visitor 当Babel处理一个节点时,是以访问者的形式获取节点信息,并进行相关操作,这种方式是通过一个visitor对象来完成的,在visitor对象中定义了对于各种节点的访问函数,这样就可以针对不同的节点做出不同的处理。我们编写的Babel插件其实也是通过定义一个实例化visitor对象处理一系列的AST节点来完成我们对代码的修改操作。举个栗子:
我们想要处理代码中用来加载模块的import命令语句
1 import { Ajax } from '../lib/utils' ;
那么我们的Babel插件就需要定义这样的一个visitor对象:
1
2
3
4
5
6
7
8
9
10
11
12
13
14
visitor: { Program: { enter(path, state ) { console.log ('start processing this module...'); }, exit(path, state ) { console.log ('end processing this module!'); } }, ImportDeclaration (path, state ) { console.log ('processing ImportDeclaration...'); // do something } }
当把这个插件用于遍历中时,每当处理到一个import语句,即ImportDeclaration节点时,都会自动调用ImportDeclaration()方法,这个方法中定义了处理import语句的具体操作。ImportDeclaration()都是在进入ImportDeclaration节点时调用的,我们也可以让插件在退出节点时调用方法进行处理。
1
2
3
4
5
6
7
8
9
10
11
12
visitor: { ImportDeclaration: { enter(path, state) { console.log('start processing ImportDeclaratio...' ); // do something }, exit (path, state) { console.log('end processing ImportDeclaratio!' ); // do something } }, }
当进入ImportDeclaration节点时调用enter()方法,退出ImportDeclaration节点时调用exit()方法。上面的Program节点(Program节点可以通俗地解释为一个模块节点)也是一样的道理。值得注意的是,AST的遍历采用深度优先遍历,所以上述import代码块的AST遍历的过程如下:
─ Program.enter()
  ─ ImportDeclaration.enter()
  ─ ImportDeclaration.exit()
─ Program.exit()
所以当创建访问者时你实际上有两次机会来访问一个节点。
ps: 有关AST中各种节点类型的定义可以查看Babylon手册:https://github.com/babel/babylon/blob/master/ast/spec.md
Path 从上面的visitor对象中,可以看到每次访问节点方法时,都会传入一个path参数,这个path参数中包含了节点的信息以及节点和所在的位置,以供对特定节点进行操作。具体来说Path 是表示两个节点之间连接的对象。这个对象不仅包含了当前节点的信息,也有当前节点的父节点的信息,同时也包含了添加、更新、移动和删除节点有关的其他很多方法。具体地,Path对象包含的属性和方法主要如下:
── 属性
  - node   当前节点
  - parent  父节点
  - parentPath 父path
  - scope   作用域
  - context  上下文
  - ...
── 方法
  - get   当前节点
  - findParent  向父节点搜寻节点
  - getSibling 获取兄弟节点
  - replaceWith  用AST节点替换该节点
  - replaceWithMultiple 用多个AST节点替换该节点
  - insertBefore  在节点前插入节点
  - insertAfter 在节点后插入节点
  - remove   删除节点
  - ...
具体的可以查看babel-traverse 。
这里我们继续上面的例子,path参数的node属性包含哪些信息:
1
2
3
4
5
6
visitor: { ImportDeclaration (path, state ) { console.log (path.node); // do something } }
打印结果如下:
1
2
3
4
5
6
7
8
9
10
11
12
13
14
15
16
17
18
19
20
21
22
23
24
25
26
Node { type : 'ImportDeclaration' , start : 5 , end : 41 , loc : SourceLocation { start : Position { line : 2 , column : 4 }, end : Position { line : 2 , column : 40 } }, specifiers : [ Node { type : 'ImportSpecifier' , start : 14 , end : 18 , loc : [SourceLocation], imported : [Node], local : [Node] } ], source : Node { type : 'StringLiteral' , start : 26 , end : 40 , loc : SourceLocation { start : [Position], end : [Position] }, extra : { rawValue : '../lib/utils' , raw : '\' ../lib/utils\'' }, value : '../lib/utils' } }
可以发现除了type、start、end、loc这些常规字段,ImportDeclaration节点还有specifiers和source这两个特殊字段,specifiers表示import导入的变量组成的节点数组,source表示导出模块的来源节点。这里再说一下specifier中的imported和local字段,imported表示从导出模块导出的变量,local表示导入后当前模块的变量,还是有点费解,我们把import命令语句修改一下:
1 import { Ajax as ajax } from '../lib/utils' ;
然后继续打印specifiers第一个元素的imported和local字段:
1
2
3
4
5
6
7
8
9
10
11
12
13
14
15
16
17
18
19
20
Node { type : 'Identifier' , start : 22 , end : 26 , loc : SourceLocation { start : Position { line : 2 , column : 21 }, end : Position { line : 2 , column : 25 }, identifierName : 'ajax' }, name : 'ajax' } Node { type : 'Identifier' , start : 14 , end : 18 , loc : SourceLocation { start : Position { line : 2 , column : 13 }, end : Position { line : 2 , column : 17 }, identifierName : 'Ajax' }, name : 'Ajax' }
这样就很明显了。如果不使用as关键字,那么imported和local就是表示同一个变量的节点了。
State State是visitor对象中每次访问节点方法时传入的第二个参数。如果看Babel手册里的解释,可能还是有点困惑,简单来说,state就是一系列状态的集合,包含诸如当前plugin的信息、plugin传入配置参数信息,甚至当前节点的path信息也能获取到,当然也可以把babel插件处理过程中的自定义状态存储到state对象中。
Scopes(作用域) 这里的作用域其实跟js说的作用域是一个道理,也就是说babel在处理AST时也需要考虑作用域的问题,比如函数内外的同名变量需要区分开来,这里直接拿Babel手册里的一个例子解释一下。考虑下列代码:
1
2
3
function square (n) { return n * n; }
我们来写一个把 n 重命名为 x 的visitor。
1
2
3
4
5
6
7
8
9
10
11
12
13
visitor: { FunctionDeclaration(path ) { const param = path .node .params[0 ]; paramName = param.name ; param.name = "x" ; }, Identifier(path ) { if (path .node .name === paramName) { path .node .name = "x" ; } } }
对上面的例子代码这段访问者代码也许能工作,但它很容易被打破:
1
2
3
4
function square (n) return n * n; } var n = 1 ;
上面的visitor会把函数square外的n变量替换成x,这显然不是我们期望的。更好的处理方式是使用递归,把一个访问者放进另外一个访问者里面。
1
2
3
4
5
6
7
8
9
10
11
12
13
14
15
visitor: { FunctionDeclaration(path ) { const updateParamNameVisitor = { Identifier(path ) { if (path .node .name === this.paramName) { path .node .name = "x" ; } } }; const param = path .node .params[0 ]; paramName = param.name ; param.name = "x" ; path .traverse(updateParamNameVisitor, { paramName }); }, }
到这里我们已经对Babel工作流程大概有了一些了解,下面我们再说一下Babel的工具集。
Babel的工具集 Babel 实际上是一组模块的集合,在上面介绍Babel工作流程中也都提到过。
“Babylon 是 Babel的解析器。最初是从Acorn项目fork出来的。Acorn非常快,易于使用,并且针对非标准特性(以及那些未来的标准特性) 设计了一个基于插件的架构。”。这里直接引用了手册里的说明,可以说Babylon定义了把代码解析成AST的一套规范。引用一个例子:
1
2
3
4
5
6
7
8
9
10
11
12
13
14
15
import * as babylon from "babylon" ;const code = `function square(n) { return n * n; }`; babylon.parse(code); // Node { // type : "File" , // start: 0 , // end : 38 , // loc: SourceLocation {...} , // program: Node {...} , // comments: [], // tokens: [...] // }
babel-traverse用于维护操作AST的状态,定义了更新、添加和移除节点的操作方法。之前也说到,path参数里面的属性和方法都是在babel-traverse里面定义的。这里还是引用一个例子,将babel-traverse和Babylon一起使用来遍历和更新节点:
1
2
3
4
5
6
7
8
9
10
11
12
13
14
15
16
17
18
19
import * as babylon from "babylon" ;import traverse from "babel-traverse" ;const code = `function square(n) { return n * n; }`; const ast = babylon.parse(code); traverse(ast, { enter(path ) { if ( path .node .type === "Identifier" && path .node .name === "n" ) { path .node .name = "x" ; } } });
babel-types是一个强大用于处理AST节点的工具库,“它包含了构造、验证以及变换AST节点的方法。该工具库包含考虑周到的工具方法,对编写处理AST逻辑非常有用。”这个工具库的具体的API可以参考Babel官网:https://babeljs.io/docs/en/babel-types
这里我们还是用import命令来演示一个例子,比如我们要判断import导入是什么类型的导入,这里先写出三种形式的导入:
1
2
3
import { Ajax } from '../lib/utils' ;import utils from '../lib/utils' ;import * as utils from '../lib/utils' ;
用于表示上面导入的三个变量的节点是不同的,分别叫做ImportSpecifier、ImportDefaultSpecifier和ImportNamespaceSpecifier。具体可以参考这里 。
1
2
3
4
5
6
7
8
9
10
11
12
13
function plugin ( return ({ types } ) => ({ visitor: { ImportDeclaration (path, state) { const specifiers = path.node.specifiers; specifiers.forEach((specifier ) => { if (!types.isImportDefaultSpecifier(specifier) && !types.isImportNamespaceSpecifier(specifier)) { } }) } } }
到这里,关于Babel的原理差不多都讲完了,下面我们尝试写一个具体功能的Babel插件。
Babel插件实践 这里我们尝试实现这样一个功能:当使用UI组件库时,我们常常只会用到组件库中的部分组件,就像这样:
1 import { Select, Pagination } from 'xxx-ui' ;
但是这样却引入了整个组件库,那么打包的时候也会把整个组件库的代码打包进去,这显然是不太合理的,所以我们希望能够在打包的时候只打包我们需要的组件。
Let’s do it!
首先我们需要告诉Babel怎么找到对应组件的路径,也就是说我们需要自定义一个规则告诉Babel根据指定名称加载对应组件,这里我们定义一个方法:
1 "customSourceFunc" : componentName =>`./xxx-ui/src/components/ui-base/${componentName} /${componentName} ` )}
这个方法作为这个插件的配置参数,可以配置到.babelrc或者babel-loader里面。
1
2
3
4
5
6
7
8
9
10
11
12
13
14
15
16
17
18
19
20
21
22
23
24
25
26
27
28
29
30
31
32
33
34
35
36
37
visitor: { ImportDeclaration (path, { opts }) { const specifiers = path.node.specifiers; const source = path.node.source; if (Array .isArray(opts)) { opts.forEach(opt => assert(opt.libraryName, 'libraryName should be provided' ); }); if (!opts.find(opt =>return ; } else { assert(opts.libraryName, 'libraryName should be provided' ); if (opts.libraryName !== source.value) return ; } const opt = Array .isArray(opts) ? opts.find(opt => opt.camel2UnderlineComponentName = typeof opt.camel2UnderlineComponentName === 'undefined' ? false : opt.camel2UnderlineComponentName; opt.camel2DashComponentName = typeof opt.camel2DashComponentName === 'undefined' ? false : opt.camel2DashComponentName; if (!types.isImportDefaultSpecifier(specifiers[0 ]) && !types.isImportNamespaceSpecifier(specifiers[0 ])) { const declarations = specifiers.map((specifier ) => { const transformedSourceName = opt.camel2UnderlineComponentName ? camel2Underline(specifier.imported.name) : opt.camel2DashComponentName ? camel2Dash(specifier.imported.name) : specifier.imported.name; return types.ImportDeclaration([types.ImportDefaultSpecifier(specifier.local)], types.StringLiteral(opt.customSourceFunc(transformedSourceName))); }); path.replaceWithMultiple(declarations); } } }
代码中的camel2UnderlineComponentName和camel2DashComponentName可以先不考虑,不过从字面上也能猜到是什么功能。
我们来测试一下效果,
1
2
3
4
5
6
7
8
9
10
11
12
13
14
15
16
17
18
19
20
21
22
23
24
25
26
27
28
29
const babel = require ('babel-core' ); const types = require ('babel-types' ); const plugin = require ('./../lib/index.js' ); const visitor = plugin({types}); const code = ` import { Select as MySelect, Pagination } from 'xxx-ui' ; import * as UI from 'xxx-ui' ; const result = babel.transform(code, { plugins: [ [ visitor, { "libraryName" : "xxx-ui" , "camel2DashComponentName" : true , "customSourceFunc" : componentName =>(`./xxx-ui/src/components/ui-base/${componentName}/${componentName} `)} } ] ] }); console .log(result.code);// import MySelect from './xxx-ui/src/components/ui-base/select/select' ;// import Pagination from './xxx-ui/src/components/ui-base/pagination/pagination' ;// import * as UI from 'xxx-ui' ;
这个Babel已发布到npm,插件地址:https://www.npmjs.com/package/babel-plugin-import-slim
有兴趣的也可以查看插件源码:https://github.com/hudingyu/babel-plugin-import-slim
其实这个插件算是乞丐版的按需加载组件,ant-design的按需加载插件babel-plugin-import 实现了更完备的方案,也对React做了特殊适配,后续有时间我会对这个插件做一次源码的分析。
差不多就是这样了。
以上。